SIMULIDE 1.x ARDUINO SHIELDS

"Writing a really great query for a chatbot is a surprisingly high-impact skill and an early example of natural language programming," said Sam Altman, CEO of OpenAI, creator of ChatGPT. ... As you know, during a gold rush, mining tools are the most profitable. ... have come up with platforms to quickly find, buy and sell queries for AI, such as PromptHero, Promptist, Krea, PromptBase ... Trainers and educators are popping up like mushrooms after the rain, offering to teach workers how to use new technologies, and training sites like Udemy already offer many courses on them. Lots of new "query engineer" jobs have opened, and many job seekers are already adding those two magic words to their resumes. Freelance marketplaces like Fiverr and Upwork are already filled with people offering their AI skills. There are no shortage of books in the "For Dummies" series, such as "PROMPT: A practical guide to brand growth using ChatGPT (by Richard Bowman and David Boyle.)

https://3dnews.ru/1082615/

Я не стану утомлять вас использованием этой модной технологии, а просто опишу здесь подход, использованный мной для получения ответа на простой вопрос:

Дано: Симулятор SimulIDE v.1.0.1

Требуется: Научиться использовать "DigitShield" для создания новых Shield'ов, используя для этого имеющийся интеллект поисковых движков.

Решение:

  1. Запрос на ya.ru: simulide latest testerbuild

    top answer: SimulIDE trunk Tester builds.
    https://simulide.forumotion.com/t550-simulide-trunk-tester-builds
    These are last builds of trunk branch at Revision: - Rev 1530:

    почему ya.ru?
    пользователи этого движка более заинтересованы в "качественной бесплатной халяве". меньше коммерческих фильтров.
    почему с грамматической ошибкой (testerbuild)
    большинство не знают английского, просто интуиция..

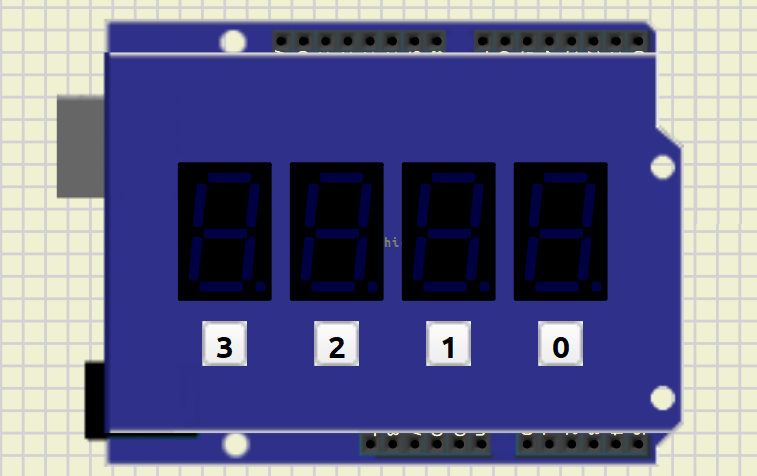
  2. Когда-то (201x) покупал для рельного Arduino Uno LCD shield и Multifunctional shield, дешевые и максимально удобные для изучения (обучения) сабжу.

    File explorer: search "shield"

    SimulIDE-R1530_Win64\data\shields\DigitShield
      DigitShield.package
      DigitShield.sim1
    SimulIDE-R1530_Win64\data\shields\LcdShield
      LcdShield.package
      LcdShield.sim1
    
  3. Изучаем имеющиеся "shield"ы как обычные схемы, удалив package, добавив ручное управление ("Fixed volt."), индикаторы напряжения ("Probe") и подключив плату Arduino согласно маркировке ("Tunnel")

    LcdShield -- это c детства знакомый Hitachi LCD-HD44780 Arduino LCD Keypad Shield (есть пример в SimulIDE версии 0.4.15), но с измененными пинами подключения, оригинальная прошивка здесь:

    https://handsontec.com/index.php/arduino-4-using-lcdkeypad-shield/

    Рабочий код будет выглядеть так:

    #include <LiquidCrystal.h>
    
    LiquidCrystal lcd(11, 10, 5, 4, 3, 2); // LCD pins
    
    void setup() {
      lcd.begin(16, 2);                    // cols x rows
      lcd.setCursor(0,0);
      lcd.print("LCD Key Shield");
      lcd.setCursor(0,1);
      lcd.print("Press Key:");
    }
    
    void loop() {
      int x;
      x = analogRead(0);
      lcd.setCursor(10,1);
      if (x < 60)       lcd.print ("Right   ");
      else if (x < 200) lcd.print ("Up      ");
      else if (x < 400) lcd.print ("Down    ");
      else if (x < 600) lcd.print ("Left    ");
      else if (x < 800) lcd.print ("Select  ");
    }
    

    DigitShield требует более пристального внимания, прошивку придется написать самому, либо купить у Диего.

    Тоннель 5 выглядит как ошибка, в разрыв провода добавим инвертор. Ура, можно самому строить shields.

  4. Google: simulide create shield tutorial

    top answer:
    SimulIDE 0.4.15-SR1 : Creating and using Shields. - YouTube
    https://www.youtube.com/watch?v=A_WNXl7-qqY

  5. Писать прошивку с нуля долго, обращаем внимание. что весь shield управляется тремя проводами.

    Нашел здесь, не помню как:

    https://forum.arduino.cc/t/driving-4-digit-7-segment-displays-from-arduino-with-only-3-pins/362102

    Код понравился тем, что мальчик не пользуется библиотеками (за что все его там и ругают)

    // SW SPI PIN SETUP
    
    int SS1 = 2; // set slave select 1 pin
    ..
    
  6. Полезная информация:

    rclick -> properties -> help
    

    Ram/Rom:

    This component can be configured as Ram or Rom, just adding persistance the data will be saved to circuit file acting as a EEPROM. You must save the circuit to get data persistance.

    It is possible to save memory data to a file and load from file.

    It is also configurable in size:

    • Address Bits: size in words = 2^Address_Bits.
    • Data Bits: size of word in bits.

    By default it is a 256 bytes Ram ( 8 address bits, 8 data bits, no persistance ).

  7. А что в ПЗУ?

    rclick -> save data

  8. Возникает потребность клонировать имеющийся shield. Это проще, чем создавать с нуля по ролику с youtube, а потом учитывать нигде не опубликованные изменения при переходе с версии 0.4.15 к версии 1.0.1-R1530.

    1. Клонировать папку data/DigitShield в папку data/MyShield
    2. В папке MyShield переименовать
      DigitShield.package to MyShield.package
      DigitShield.sim1 to MyShield.sim1
      # Note: 
      sed -ie 's/DigitShield/MyShield/g' \
          MyShiled.sim1 MyShield.package
      
    3. Нарисовать икону (32x32) в data/images/MyShield_icon.png
    4. Добавить строчку в data/shields.xml (..MyShield..)
      <!DOCTYPE SimulIDE>
      <itemlib>
        <itemset category="Shields" 
                 type="Subcircuit" 
                 folder="shields">
          <item name="LcdShield" 
                info=" (experimental)" 
                icon="lcdshield_icon.png"/> 
          <item name="DigitShield" 
                info=" 4 digit 7-segment LED display"
                icon="DigitShield_icon.png"/>
          <item name="MyShield" 
                info=" 4 digit 7-segment LED simplified"
                icon="MyShield_icon.png"/>
         </itemset>
        </itemlib>
      
    5. Перезапустить SimulIDE
    6. Открыть MyShield.sim1 как схему. Правой кнопкой на икону Shield появится переключатель [v] Board Mode
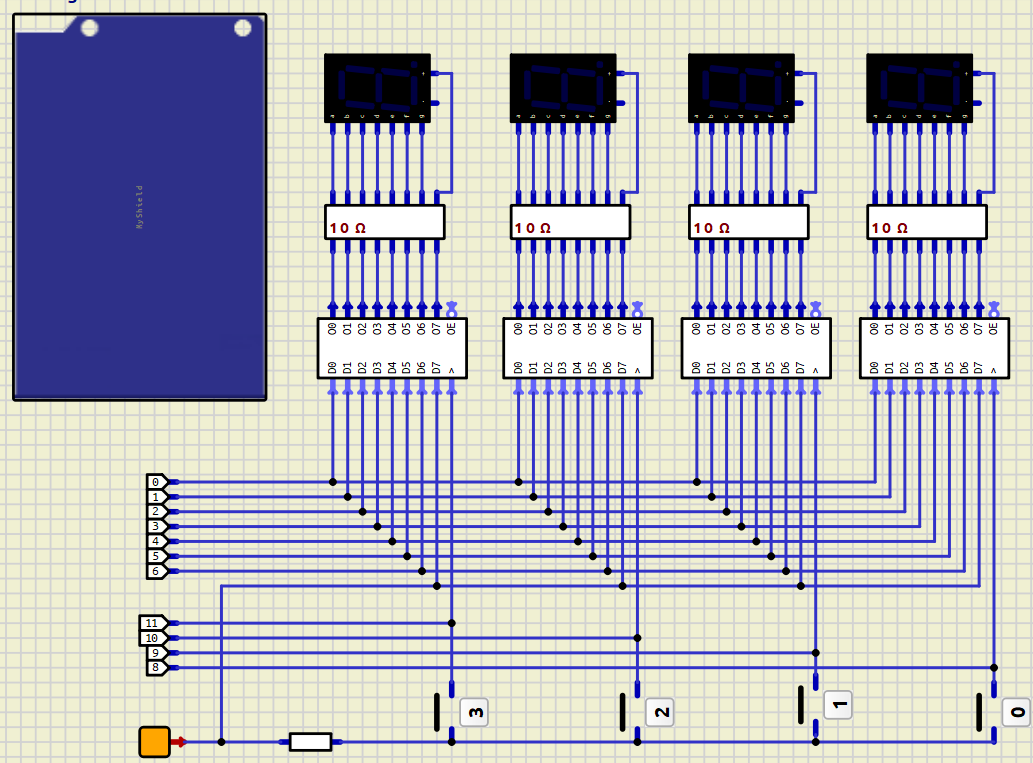
  9. Танцы с бубном вокруг годами неинициализированных переменных (dirty define) и прочих багов c динамической памятью и не только, навели меня на мысль создать shield с функциональностью, похожей на DigitShield, но на параллельном интерфейсе (7 бит данных + 4 бита адреса (принято /кем?/ в три провода, так тут вопрос: почему так много?.. как известно из анекдота, счет (1,2.3..) у противниц любовных треугольников такой -- "один, много.."). Дальше shield можно оставить в покое, и заняться, наконец, кодописательством

Схема здесь (без shields.xml)

  1. Больная для меня тема -- это минимизация трафика, требующегося для управления объектом, изначально абсолютно глупым, но желающим научиться получать, понимать, анализировать и использовать полученную информацию.
/*
  # Arduino UNO to ATMEGA328P

  +---------+------+---------+
  | Arduino | MEGA | Role    |
  +---------+------+---------+
  | D13.....|.PB5. |.SCK     |
  | D12.....|.PB4. |.MISO    |
  | D11.....|.PB3. |.MOSI    |
  | D10.....|.PB2. |.SS      |
  | D9......|.PB1. |.IO9     |
  | D8......|.PB0. |.IO8     |
  |         |      |         |
  | D7......|.PD7. |.IO7     |
  | D6......|.PD6. |.IO6     |
  | D5......|.PD5. |.IO5     |
  | D4......|.PD4. |.IO4     |
  | D3......|.PD3. |.IO3     |
  | D2......|.PD2. |.IO2     |
  | D1......|.PD1. |.IO1     |
  | D0......|.PD0. |.IO0     |
  |         |      |         |
  | A5......|.PC5. |.AD5/SCI |
  | A4......|.PC4. |.AD4/SDA |
  | A3......|.PC3. |.AD3     |
  | A2......|.PC2. |.AD2     |
  | A1......|.PC1. |.AD1     |
  | A0......|.PC0. |.AD0     |
  +---------+------+---------+
                                              ---------
  7SEG-a  PD1  R 200            a ---/\/\/---|  aaaaa  |
  7SEG-b  PD2  R 200            b ---/\/\/---| f     b |
  7SEG-c  PD3  R 200            c ---/\/\/---| f     b |
  7SEG-d  PD4  R 200            d ---/\/\/---|  ggggg  |
  7SEG-e  PD5  R 200            e ---/\/\/---| e     c |
  7SEG-f  PD6  R 200            f ---/\/\/---| e     c |
  7SEG-g  PD7  R 200            g ---/\/\/---|  ddddd  |
                                              ---------
                                               |     |
                                              dot   GND 
*/
int x = 0;
int c = 1;

int i2c[] = { 
  0xc0, 0xf9, 0xa4, 0xb0, 0x99, 0x92, 0x82, 0xf8, 
  0x80, 0x90, 0x88, 0x83, 0xa7, 0xa1, 0x86, 0x8e,
  0xc2, 0x8b, 0xe6, 0xf2, 0x89, 0xc7, 0xc9, 0xab,
  0xa3, 0x8c, 0x98, 0xaf, 0x92, 0x87, 0xc1, 0xe3,
  0x81, 0xeb, 0x91, 0xb6, 0xff, 0x9c, 0xb7, 0xdd
};

void setup() {
  DDRD = 0xff;
  DDRB = 0x0f;
  PORTD = PORTB = 0;
}

void loop() {
  PORTD = i2c[x];
  PORTB = c;
  delay(10);
  PORTB = 0;
  delay( 1000);
  x = x >= 39 ? 0 : x + 1;
  c = c >= 8 ? 1 : c << 1;
}
  1. Нарисовать фонт:[0123456789AbcdEFGhiJKLMnoPqrStuWxYZ °="]
   0       -       0       0       -       0       0       0
  5 1     | 1     | 1     | 1     5 1     5 |     5 |     | 1
   -       -       6       6       6       6       6       -
  4 2     | 2     4 |     | 2     | 2     | 2     3 2     | 2
   3.      -.      3.      3.      -.      3.      3.      -.

  "0"     "1"     "2"     "3"     "4"     "5"     "6"     "7"
        11111001        10110000        10010010        11111000
11000000  0xf9  10100100  0xb0  10011001  0x92  10000010  0xf8
  0xc0           0xa4             0x99            0x82  

   0       0       0       -       -       -       0       0
  5 1     5 1     5 1     5 |     | |     | 1     5 |     5 |
   6       6       6       6       6       6       6       6
  4 2     | 2     4 2     4 2     4 |     4 2     4 |     4 |
   3.      3.      -.      3.      3.      3.      3.      -.

  "8"     "9"     "A"     "b"     "c"     "d"     "E"      "F"
        10010000        10000011        10100001        10000111
10000000  0x90  10001000  0x83  10100111  0xa1  10000110  0x87
  0x80            0x88            0xa7            0x86

   0       -       0       0       -       -       -       -
  5 |     5 |     | |     | |     5 1     5 |     5 1     | |
   -       6       -       -       6       -       -       6
  4 2     4 2     4 |     | 2     4 2     4 |     4 2     4 2
   3.      -.      3.      3.      _.      3.      -.      -.

  "G"     "h"     "i"     "j"     "K"     "L"     "M"     "n" 
        10001011        11110010        11000111        10101011
11000010  0x8b  11100110  0xf2  10001001  0xc7  11001001  0xab
  0xc2            0xe6            0x89            0xc9

   -       0       0       -       0       -       -       -
  | |     5 1     5 1     | |     5 |     5 |     5 1     | |
   6       6       6       6       6       6       -       -
  4 2     4 |     | 2     4 |     | 2     4 |     4 2     4 2
   3.      -.      -.      -.      3.      3.      3.      3.
  
  "o"     "P"    "q"      "r"     "S"     "t"     "U"     "v" 
        10001100        10101111        10000111        11100011
10100011  0x8c  10011000  0xaf  10010010  0x87  11000001  0xe3
  0xa3            0x98            0x92            0xc1

   -       -       -       0       -       0       -       -
  5 1     | |     5 1     | |     | |     5 1     | |     5 1
   6       -       6       6       -       6       6       -
  4 2     4 2     | 2     | |     | |     | |     | |     | |
   3.      -.      3.      3.      -.      -.      3.      -.

  "w"     "x"     "y"     "Z"     " "     "°"     "="     '"'
        11101011        10110110        10011100        11011101
10000001  0xeb  10010001  0xb6  11111111  0x9c  10110111  0xdd
  0x81            0x91            0xff            0xb7